Ah, the holiday season…where everybody, including me, starts to panic about presents for the loved ones in their life. Like anybody who knits, I get loads of requests for last minute speed-knitting of pretty, warming things. Some of them are very doable. Many are too time-crunching. A few are jaw-droppingly ludicrous. Sweaters. Elaborate socks. Entire blankets. Union suits. Alien face-hugger masks with bendable leggies. Huge Dwarf helmet-hats with horns and braided beards. While it’s extremely flattering to hear that people think I have magical knitterly skills, I have to turn the big projects down. I also start getting that hunted look on my face, where I’m expecting to sprint down the corridors at work with my coworkers chasing me, yelling, “No, wait, it’s just a last-minute thing, I know you can do it by Christmas!! Come Baaaack!”
But that said, I’ve cranked out a few pretty things, here and there…
Mochi Marshmallow wristwarmers, with mohair,merino and handspun angora…A skein of silver angora I plied with a soft silk thread for extra strength and shine…
Both of these lovely things have already been claimed. I should make more. When can I make more? So many things to make!! So many! Do I have enough yarn? The right kind? Do I have to make some? Why did I make this fussy, time-consuming thing that everybody wants now? I Must Make Many Many THIIIIIIIINGS!!
And then possibly ask Santa for a Time-Turner, or manybe a Margarita machine. It’s medicinal, I tellya…
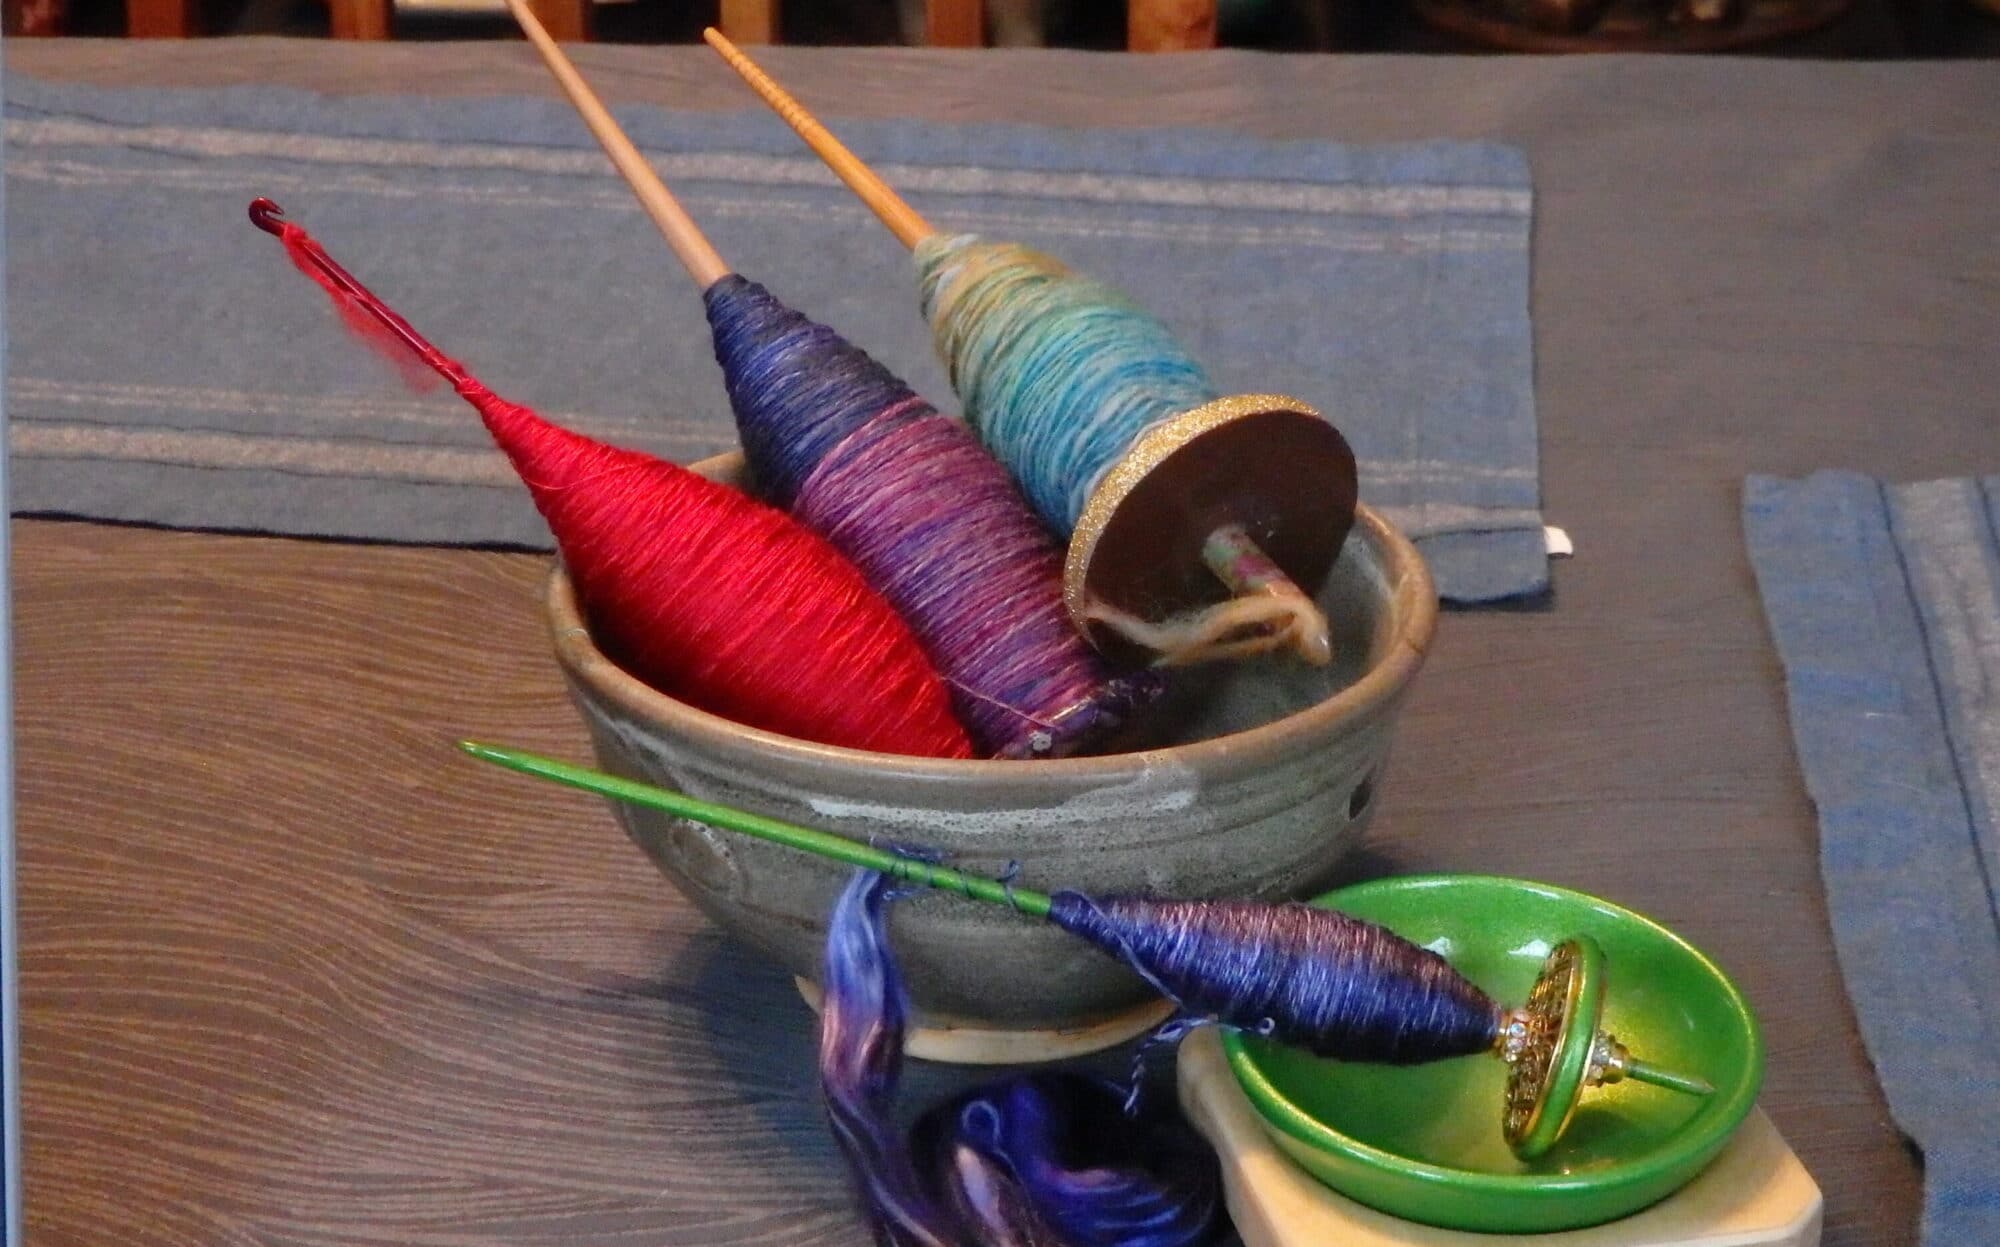
Ahhh, today is wonderful…dark, rainy, gloomy! Just the right kind of day to do some spinning! What’s that, you say? Don’t spin? But you’re dying to learn? *rubs hands together* Eeeeeexcellent…
Don’t be frightened–spinning is easy to learn and takes very little money to start. By now you probably have a nice little spindle you’ve made, all by yourself, with instructions from my last tutorial. Or you can buy them online–there’s all kinds of gorgeous spindles out there for beginners for reasonable prices. Wool is also easy to come by on the net–before long you’ll have your favorite suppliers to stock you up on demand, but I started out with the mother-ship of spinning acoutrements, the website at Halcyon Yarn. They have everything you need, and I do mean everything. But for a starter yarn, go easy and cheap–no alpaca or camel or angora or yak, not yet. Blue-faced Leister is a great beginners wool, as is Icelandic and Romney. A simple drop spindle and a handful of fiber, waiting to be transformed into something wonderful.
The first thing you’ll want to do is fluff up your fibers. If you bought roving in long strips or braids, untie the braids and gently tear the roving into nice, manageable strips. If you have a batt, you can tear off chunks as you spin. Or you can just take locks of wool and use your fingers or a dog comb to make a nice fluffy pile. And take a minute to roll a little fiber around in your fingers. How does it feel? Twirl some around with your hands, and see what feels good to you. That’s how you’ll want your yarn to feel. Now, tie some leftover yarn to your spindle, under the whorl, and loop it through the hook on top. (This is called, the ‘leader” yarn.)Put a slip knot in the top, then thread a little fiber through the loop and pull nice and tight. This will anchor your fiber for spinning… A spindle, all ready to spin!
Now, hold the yarn loop with your dominant hand, and let the spindle hang down from the leader yarn. Spin it with your fingers, counterclockwise. Let the twist go up into your fiber. You can stop your spindle anytime and use your fingers to smooth out your yarn. One hand will end up controlling the twist by pinching off the yarn, and the other hand will end up “drafting”; basically pulling at your fiber until it’s the thickness you want. Don’t be too worried about drafting right now–you just want to get the hang of the twisting from the spindle running up into your fiber the way you want. Spinning up the first bit of yarn. Let the twist from your spindle run up into the fiber.
How’s a good way to tell how your yarn is going? You can let it loop back on itself to see if it feels soft and comfortable. If it feels too tight and harsh, it has too much twist, and you can fix it by letting the twist run further up the fibers. If it’s coming apart, twist it a little more. But trust your fingers; they know what they want your yarn to feel like. You can always stop, untwist all the fiber and start over if it’s not the way you want it. This fiber looped onto itself really nicely. it’s not too tight, not too loose.
Running out of fiber? Add a little more! Just take your next bit of fiber and layer it over the end of your yarn. Give your spindle a spin and watch the twist run up into the new addition. Wool wants to hang onto wool, and you can keep adding on and on until your spindle is full or you’re tired of spinning, whichever comes first.New fiber added onto the first bit of fiber. The twist holds everything together!
Now, while you’re spinning and spinning, you’ll make mistakes for sure. Your wool will be lumpy. You’ll drop your spindle a dozen times or more. Your hands won’t know what to do. Just keep at it–eventually your hands will find a rhythm that makes sense, and things will get much easier. My rhythm goes like this: “Spin the spindle, pinch the yarn, pull the fibers”. The pinching is to stop the twist going further than I want it too, the pulling is to even out the next fibers to be spun up. And you can stop whenever you want, start back up whenever you want, and keep going until you can no longer fit anything onto your spindle.A very, very, very full spindle…
So what do you do with your spindle full of yarn? You can wind your new yarn into a ball as it is and knit with it. I usually prefer to set the twist–I wrap it around a niddy-noddy, a wonderful tool used to measure and skein up yarn, then take the yarn off, give it a good gentle soak in lukewarm water, *very* gently wring out the water and hang it in my shower to dry. (I use clothes hangars to weigh down the bottom of the skein so the yarn doesn’t kink.) When it’s dry, it’s nicely balanced and much easier to use. You can use that first yarn to make a funky potholder, or a headband, or a little bag to put in spinning fluff for later. But be proud of that first wonderful, lumpy, blobby yarn, and be proud of yourself!! Not everybody sticks it out with something new, and you just did!!
(If you have any extra questions about spinning, or get stuck and need a little coaching, ask me in the comments section!! I’ll walk you through any fiber kinks you run into. But I think you’ll do better than you expected.)
This week I’ve been taking a staycation to do some much-needed puttering. And one of the things I did was make a couple of new spindles from start to finish. If you want to learn how to spin but the sticker-shock of a wheel got to you, never fear! Drop spindles are easy to make, economical, and fun. Plus you can add your own personal touches! I ended up making one very large Gothly spindle for bulky weight yarns, and a more delicate flowery one…
You will need: A dowel,some sandpaper,1-2 packages of polymer clay,a good glue,paint or beeswax or wood-oil,(optional) one cup hook.(optional.)
First off, have a look at your dowel. How long is it? A good comfortable spindle should be between between 9 to 15 inches, depending on what you want to spin. If you want bulky yarns, go big. Smaller spindles are good for more delicate yarns, but if you’re new to spinning a larger spindle will be your very best friend. Sand your dowel so it doesn’t catch on your yarn and takes paint well. I also like to taper mine a bit because it looks nice. To save yourself loads of sanding for a tapered tip, you can use a pencil sharpener and then smooth everything down and take the sharp edge off. You’re looking for elegant lines, not Buffy the Vampire Slayer here…A bare dowel, sanded and ready for a hook.
You can add your hook at the top of the dowel. But if you couldn’t find a hook you liked, it’s not the end of the world. You can also add a notch to the top to hold onto your yarn. Just loop the yarn around your finger and slip it onto the notch, and it will hold nicely. You can use sandpaper to sand in your notch, or cut one carefully with a knife.A notched dowel with sample yarn. Just loop it around your notch with a half-twist, and it will hold just fine.
I would recommend painting just the top of your dowel whatever color you want at the moment, and sticking it upright in a jar to dry. You’ll use it as a handle later for painting the rest of your spindle. Meanwhile, time for the fun part–playing with clay! For a large spindle, you’ll be using a whole small package of polymer clay while a smaller one will take about 3/4 of a package. You can smoosh out the clay in a circle or square, add colors, glitter, beads, whatever makes you feel fancy. If you have a piece of your dowel left over, you can use it to make sure your center-hole will fit your spindle. If not, you can use your spindle to measure the hole,but be careful you don’t distort the hole too much.Polymer clay spindle whorls, ready to be baked.
Now that you’ve baked your whorls and they’ve had a chance to cool, you can add them carefully to your dowel. If the hole is a little tight, no worries–polymer clay is easy to sand down or even carve.If there’s a gap, it’s easy to fix with a good glue–or you can make a smaller bead with a tighter fitting hole, bake it and add it over the whorl, gluing it into place. But where to put your whorl? Some people enjoy the whorl near the top so you can show off all that hard work. But I like bottom whorls, because they’re so stable. Either way, leave a little room on the top or bottom so it’s easier for you to handle.
Once you’ve got your spindle happily positioned and glued, you can paint, wax or oil the dowel. I prefer paint and a nice clear-coat varnish…and sometimes some very small bore glitter between the pain and varnish layers. Because I get down like that. Once everything is painted, use a string to hang up your spindle somewhere out of the way to dry…The finished drop spindles, one a cute fairy spindle and one a dark, brooding Gothly one…
And there you are! Your very own spindle, for a couple of bucks and a little time…